LMS Plugin Settings - Change Visual Connection
Synergy LMS Plugin – Change Visual Database
Follow these steps to change your connection to another Visual database.
- Run the LMS Management Console (shortcut can be found on the desktop of the server where LMS is installed
- Log in: (sysMgr is the default no password)
- In the left pane, expand “Interface Plugin Management”, then “Custom”, then click “Synergy”
- Hit the “Setup” button
- Change your Visual connection information and click “Test”:
- Click OK in the Plugin Settings screen to save the changes.
Email Setup / Edit
Follow the same steps as found in the previous section, but select the SMTP tab.
Prerequisites
Database: SQL Server 2016-2019
Windows Server 2016-2019
Macro Server
Pathguide LMS 4.0.121.048
ERP: Visual 7-11
Windows Server 2016-2019
Macro Server
Pathguide LMS 4.0.121.048
ERP: Visual 7-11
Client: Windows 10\11
Installation
Use the following Production Facing Link to download the setup file. Once downloaded follow setup wizard to install on the server where Path Guide is installed.

For any new versions of LMS after 1/1/2025 they do require the latest Macro Server to be installed along with Client 480 to be installed at the customers installation.
There are many manual steps that must be done in order to ensure that the interfaces for PathGuide function as expected.
 QA Testing Download (For internal Synergy use only)
 Quality Test Release
- This will install an IIS application that is used for connectivity between Synergy’s LMS Connector (Plugin) and your Visual database.
- Once the installer is complete.
- For a new install
- Install MacroServer
- Please make sure to create the required data tables (/Database/SqlServer or /Database/Oracle)
- Run the _VIEW files last.
- At the time of this update, it is unsure from which version of LMS the SRI_LMS_UpgradeScripts*.sql apply to.
- Check the web services is running
- There are two paths to be taken here
- For installs of lms v1000.3300 or earlier (c:\Visual\LocalApps\Synergy PathGuide Plugin\bin)
- In the \bin directory where all of the plugin .dll's reside, it will be important to possible copy the most current PathGuide .dlls from PathGuide's installed location into this directory replacing the current dll's that came with the installer, with the most current PathGuide .dll's
- These include but may not be limited to the following:
- PathGuide.Common.LMS.TransactionObjects.dll
- PathGuide.Common.Data.dll
- PathGuide.Manifest.DataTypes.dll
- PathGuide.Manifest.Plugin.Base.dll
- For v1100.xxxx installs
- It is important to note, that WM - Synergy has made no changes to our library that would prevent it from running from the installed directory.
As Path Guide updates its program modules, the above step will need to be done to ensure that the Synergy libraries are in sync with current PathGuide requirements.
It has been found that with release 4.0.9270 of Path Guide
Copy the following files from C:\Program Files\PathTech\Manifest\0\bin, and replace any similar files in the LMS Plugin file folder. This will ensure that all current PathGuide libraries are available for the lms plugin to reference. (Please note that if Pathguide does any updates to their system, the end uses should be aware that the updated pathguide libraries need to be copied to the lms plugin runtime directory.)
Copy the following files from C:\Program Files\PathTech\Manifest\0\bin, and replace any similar files in the LMS Plugin file folder. This will ensure that all current PathGuide libraries are available for the lms plugin to reference. (Please note that if Pathguide does any updates to their system, the end uses should be aware that the updated pathguide libraries need to be copied to the lms plugin runtime directory.)
Licensing
To license Synergy LMS Plugin, following these steps.
Browse to the install directory and open
Enter in the license key that you were provided and click the “save” button to load it.
During the save process, the key will be validated and if valid a local license file will be created in the root directory; SynergyPathGuidePluginLic
If you need a new or updated license key, please send your request to CustomerCare@wm-synergy.com and include your Window’s domain name. Your Window’s domain name can be found in Window’s Control Panel, under System.
Visual ERP ToolBar Add On
In the shipping window one should find this button, it will run the ShipmentConsolidationApp.exe.

It is important to place a copy of the visual erp sql.ini file into this application runtime directory. Please check the Visual ERP User Tool Box to reference where the working directory is.

Using the image below we see that there is a network path setup: "\\<some unc share drive>\LMSPlugin\bin\ShipmentConsolidationApp.exe" -B
Place a copy of the Visual Erp sql.ini, into the bin directory of the given Execute_Command location.
using ssms
Place a copy of the Visual Erp sql.ini, into the bin directory of the given Execute_Command location.
using ssms
If all is well when pressing the button one should see the following (it may take a few second to load)
There is a settings area, please review to make sure these are pointing to the correct servers, Pressing [Settings] button one should see the standard settings for this application:
For most applications the web site will use http://
Shipping an item from this form will auto populate the shipper id into PathGuide (this must be running on the same client machine)
Synergy Plugin For LMS
Configuration
Configuring LMS to use Synergy’s Connector (Plugin)
Open your LMS Management Console
Login using sysmgr with no password.
Select interface Plugin Management and then Action → Add Interface Plugin
Enter the following values in the dialog
(note: you file name path might be different depending on where your install, file name you are looking for is PathGuide.Manifest.Plugin.Synergy.dll)
Test button will not work as the IHostInterface check requires the following library PathGuide.Common,Reports which breaks access to SynergyBusinessObjects.dll
Click the Setup button to configure which Visual database should be used and the http path to LMS IIS site. Use the test buttons to validate database and IIS connectivity.
(note: the ERP Webservice path will need to be accessible for all client machines that will use LMS; for example: http://Visual10.sri.local/LMS/WS.asmx
Visual Clients
There are a few files that are required to be copied over to each Visual client machine. These files will enable the ability to process consolidated shipments and auto populate LMS after each Visual shipment.
Copy the following files over to the local client:
DevExpress*.dll (all file beginning with this)
LogicNP.CryptoLicensing.dll
ShipmentConsolidationApp.exe
ShipperIdTransfer.exe
Synergy.PathGuidePlugin.License.dll
SynergyPathGuidePluginLic < if you do not see this file proceed to the licensing section below before completing the client install
Create a Visual Toolbar item that links to the consolidate shipment app.
(note: both “Use Key in Cmd Line” and “Add Entry to Toolbar” should be checked too)
In Shipment Entry, create an OnAfterSave macro with the following line:
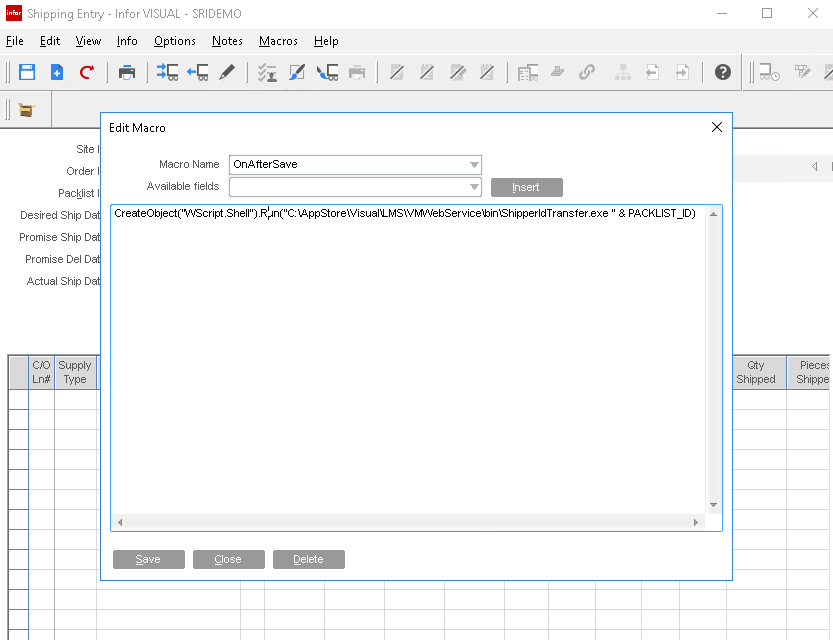
CreateObject("WScript.Shell").Run("C:\AppStore\Visual\LMS\VMWebService\bin\ShipperIdTransfer.exe " & PACKLIST_ID)
Setup Email Format
From the Synergy Plugin Settings->Select SMTP-> Press Launch Designer
Click on the 'SMTP' tab.
for Port: Enter the following details: SMTP Server Address: smtp.gmail.com Port: Use 465 for SSL or 587 for TLS
The following information should come from the customer's internal IT department.
The following information should come from the customer's internal IT department.
Press Launch Designer, to edit the email format.
Related Articles
LMS Plugin - Connector Updates
Software Updates LMS Plugin Updating the Synergy Plugin for LMS is done using a built-in updater app To find the location of this is app, open your LMS Management Console Then look for the file path highlighted below Then look for the file path ...Visual Connect RESTful Web API (DERP) - Release Notes
1100.1008 - (7/8/2026) ActivityService Add new endpoint SaveActivity for Create/Update V_TASK activities Add new endpoint SearchActivity for retrieving activity records using ActivityData filters Add new endpoint SearchActivityLike for ...Visual Connect RESTful Web API (DERP) - Technical Requirements
VISUAL ERP integration with DERP Compatability Visual 9.x.x - Visual 11 Server Requirements Windows Server 2019 4 cores 8gb of ram Recommend 4gb of free disk space (install files + logs) Prerequisites .Net Framework 4.8 Installation of Default IIS ...Troubleshooting - Visual Rendering High DPI Issues
Close out of Visual right click on visual icon and select open file location Find VM.exe Right click and select Properties Select Change High DPI settings Select the checkbox under High DPI Scaling Override Select System (Enhanced) Click ok then ...Use Single Sign On in Visual
If you get the above error when trying to log into Visual, create a shortcut pointing to VM.exe (or copy an existing shortcut to it). Right-click the shortcut and go to Properties, and at the end of the Target field, add a space and "-SYSADM" (no ...