Expensify - User Guide
LICENSING
Request for a license key can be made via email. Send your request to CustomerCare@wm-synergy.com and included the product name, company name and local Windows domain name with your request.
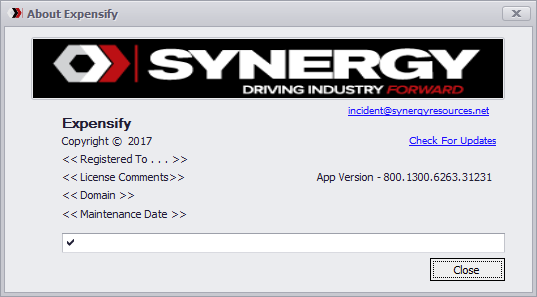
Open the about screen from the menu Help > About.
Enter you license key in the textbox

To register the key, click on the checkmark to the left.
You will receive a message box if the key was successful or failed.
You will receive a message box if the key was successful or failed.
DATA CONNECTION
A valid data connection is required and can be added using the following steps
Go to File > Data Connection

Use the connection properties window to setup your
data connection.
- The “Change…” button enables the switch between
SQL Server & Oracle
- For log on security, enter user name and password and
select “Save my password”
EXPENSIFY SETTINGS
These settings must be configured to properly connect to the Expensify API and retrieve Expense Reports. Click Here to retrieve your API settings
Click File >Expensify Settings
Input the Partner ID, Partner Secret, & Policy ID
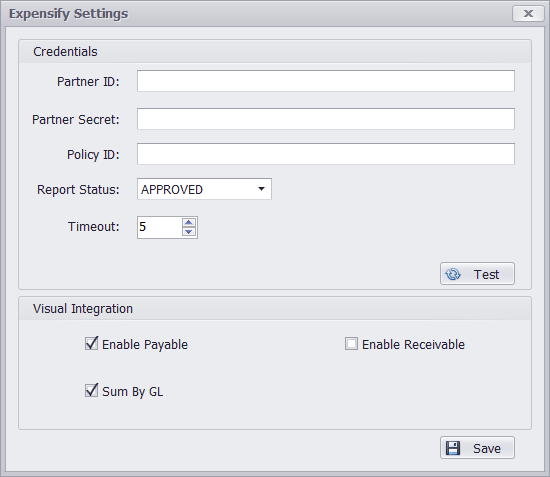
Clicking Test will verify if your Partner ID and Partner Secret are valid
Other Settings
Report Status: This will set the Expense Reports to be retrieved (Approved or Reimbursed)
Timeout: Time (in minutes) before the request to retrieve Expense Reports times out
Enable Payable: Will enable the Import Payable button in main screen
Enable Receivable: Will enable the Import Receivable button in main screen (Beta)
Sum By GL: When importing into Visual, having this setting checked will sum all similar GL IDs to a single line(s).
Click Save when finished.
UPDATING
To update go to Help > About
Click on the link – Check for Updates
The application will check to see if there are any new published updates.
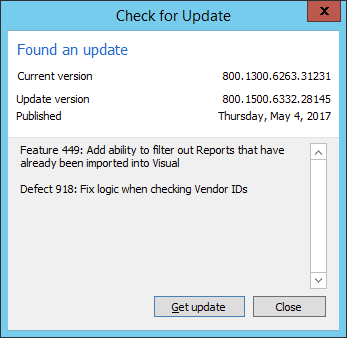
The next screen will confirm if you are on the latest version or if there is an update show a list of features & defects that are a part of the update.
Click close or follow the prompts to update your software.
If updating the application will auto download the update and install.
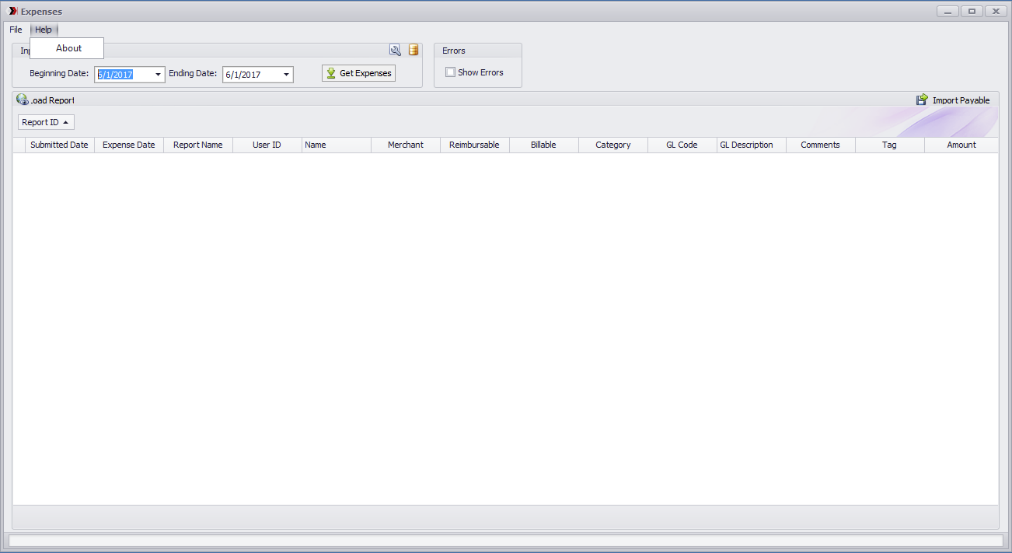
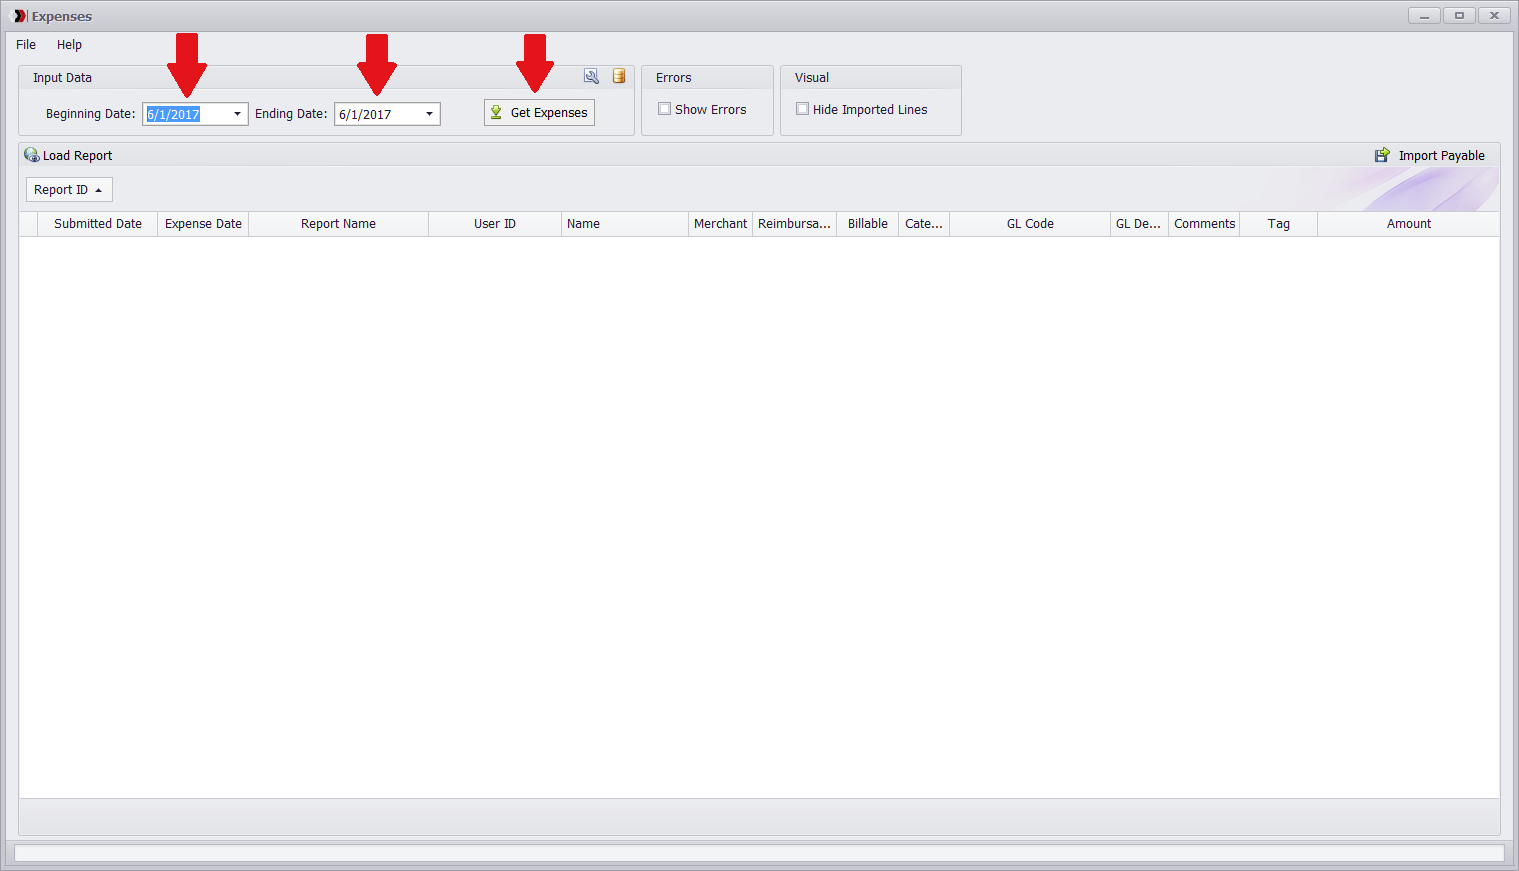
MAIN SCREEN
To retrieve expense reports, select a date range and click the Get Expenses button.
REVIEW EXPENSES
Once Expenses are retrieved, the grid in the center screen will be populated
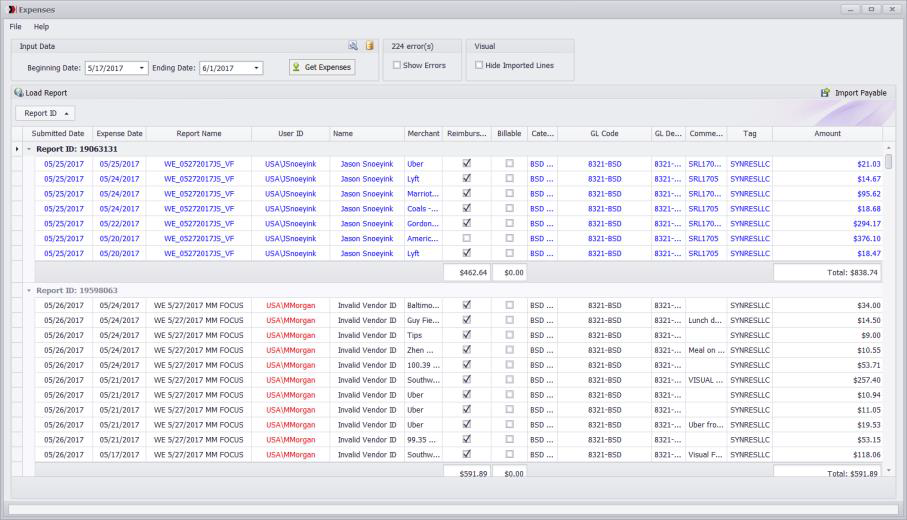
Lines that are blue are Payable lines that exist in Visual. Data fields that are red indicate a problem with the field (such as Invalid Vendor ID or GL Account ID). All problems must be addressed before Expense Reports are imported into Visual. Only lines marked as Reimbursable will be imported into Visual.
Clicking the check mark next to Show Errors will hide all lines except those that have issues. Clicking the check mark next to Hide Imported Lines will hide all lines that have already been imported into Visual
The grid allows sorting, grouping, and re-ordering. The layout will be saved when the application is exited and loaded when the application is launched.
Payable in Visual after Import
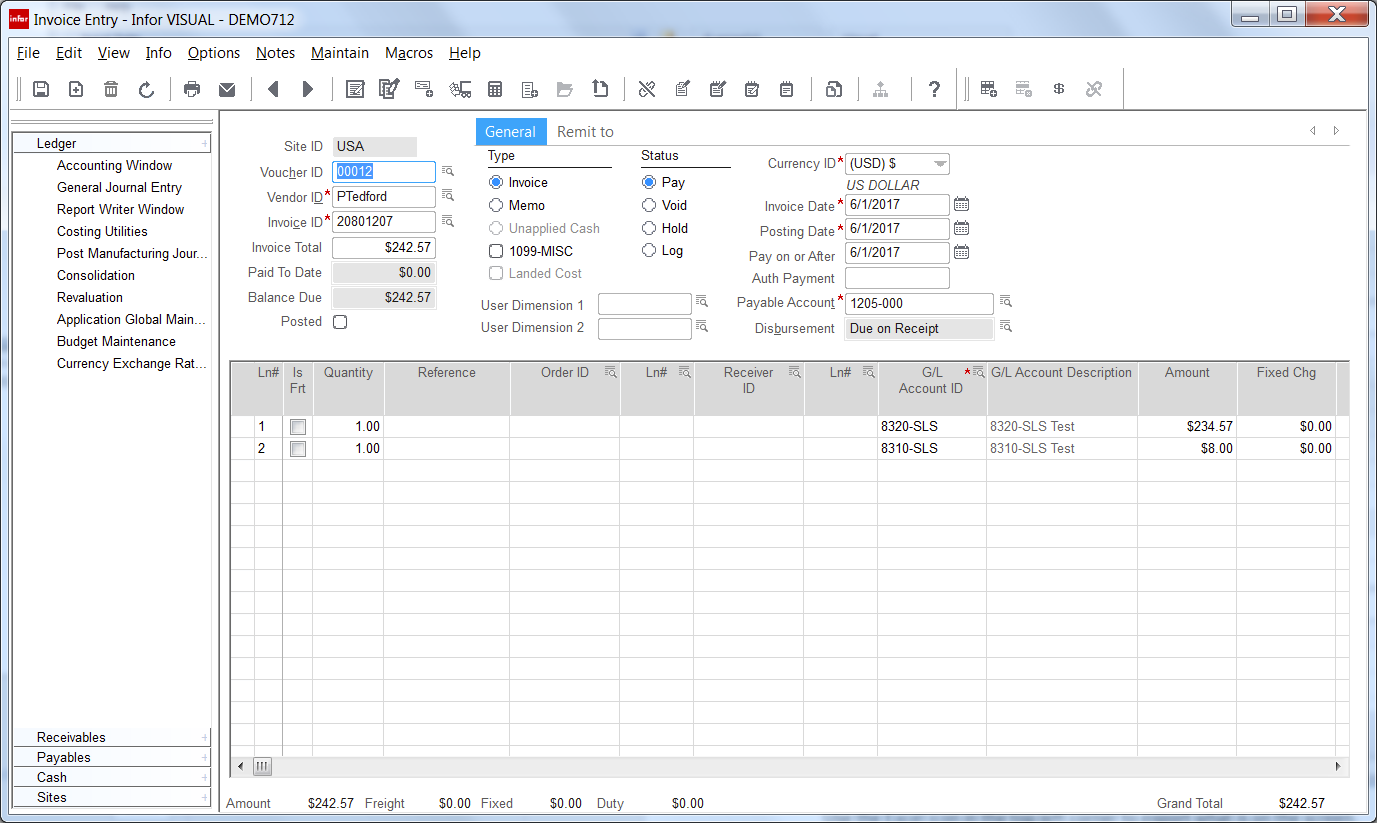
The Invoice ID will match the Report ID of the Expense Report. Each line will either be a separate expense (if Sum By GL setting is unchecked) or summed amount per GL Account ID (if Sum By GL setting is checked)
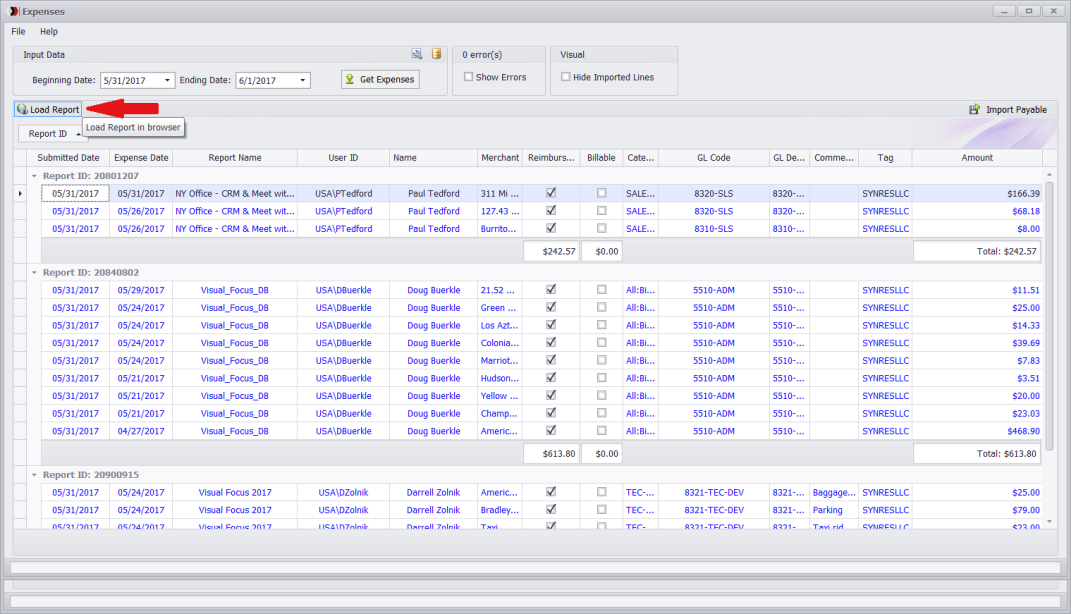
Selecting a Report in the grid of expenses and clicking on “Load Report” will load the Expense Report in your default browser (You may be prompted to log into Expensify)
GL ACCOUNT SETUP
Click on Admin, and then click on your Policy you wish to edit
Click on Admin, and then click on your Policy you wish to edit
On the left pane menu, click Category, then scroll through the middle pane to the Add textbox
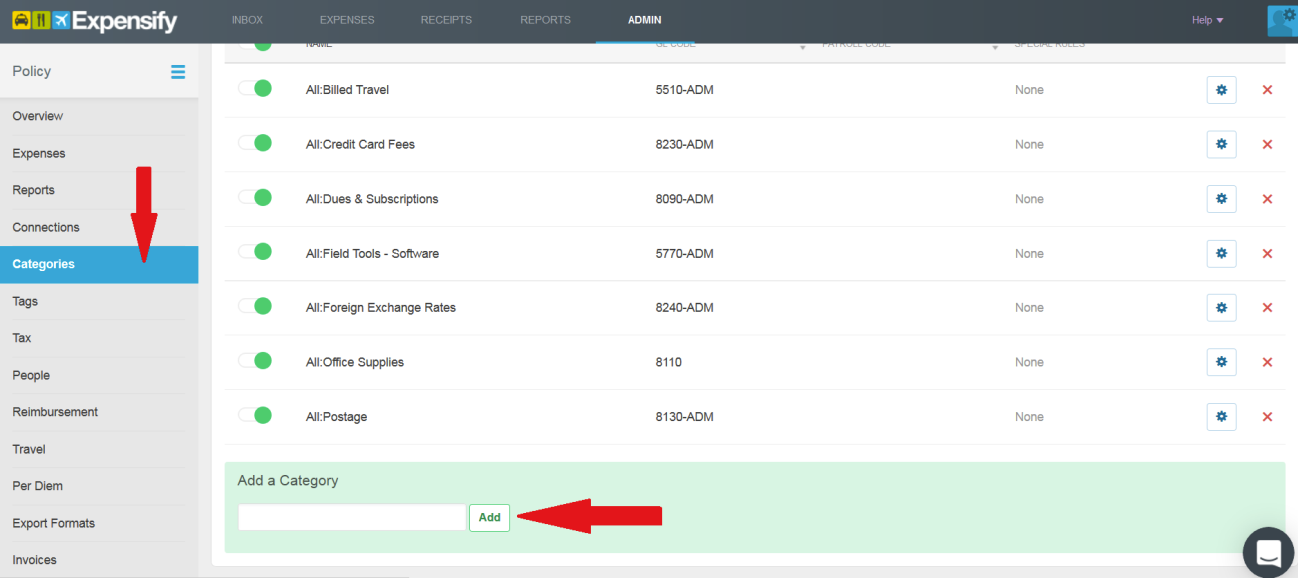
Type in a category name and click Add. Once added, you can define a GL code by scrolling over the GL Code column and clicking the pencil. This GL Code must match a GL Code in Visual.

USER SETUP
The users in Expensify should have a matching Vendor ID in Visual’s Vendor Maintenance.
Click on Admin, and then click on the Policy you wish to edit.
Click on Admin, and then click on the Policy you wish to edit.
In the left pane, click on People to get the list of User Accounts associated with this policy. Click the gear to edit the user.
Input the Vendor ID you want associated in Custom Field 1. Multi-site versions of Visual, the Custom Field 1 should be set as Site ID\Vendor ID. Single site versions of Visual only need the Vendor ID.
Related Articles
Synergy uniPoint Connector - User Guide
Installation You can find the installation document for Synergy uniPoint Connector here. How to Use Overview Synergy uniPoint Connector can be used in the following Visual windows: Customer Maintenance Customer Order Entry Part Maintenance Vendor ...Expensify - Release Notes
v1000.1300 Strip alpha characters out of Report ID (to keep the data mapping the same) v1000.1200 Use the NumericField to store the Report ID value Change display to be Numeric for that column (not string so it doesn't turn it into an expnonential ...SmartViews - How To - Add Data Connections
How to Add a data connection? Step 1 : Login to SmartViews and select Designer tab and Click on "Add" a data connection Currently, Smartviews support the following data connection: Microsoft SQL server MS Access MS Excel Oracle ODBC Lillyworks ...Launchpad Scheduler - User Guide
Launchpad Scheduler Guide In this guide the steps for creating a Basic Scheduled Report job as well as advanced Configuration Crystal Reports SAP has announced that Dec 31, 2027 Crystal Reports (.dll's) will no longer be supported by SAP. Please note ...Order Import Tool - User Guide
Administration Licensing Request for a license key can be made via email. Send your request to CustomerCare@wm-synergy.com and included the product name, company name and local Windows domain name with your request. Open application using Run As ...